How to create Bundles
With the rise of online learning, course bundles have become a popular way for students to access multiple learning materials at once, including courses and products. Bundles are a convenient and cost-effective way for students to acquire new skills.
Follow these simple steps to create bundles and increase your income.
- Head to the Marketing tab from your dashboard.
- Go to the Bundles subtab.
- Click on the Create new Bundle on the right.
Main information
After clicking on the button, you will be directed to this section. Here you can add some general information.

- Title - add the name for the bundle
- Friendly URL - this will be generated automatically based on the title. You can also edit the URL. Note that the URL cannot be changed later.
- Add image - make your bundle visually appealing with an image. The supported formats include JPG, SVG, PNG & JPEG.
- Bundle description - describe the bundle in a few words.
- Price - add the price in the corresponding field. If you want to make a discount, fill in the OLD price box. Or make the bundle free by activating the free toggle.
Click on the Next button to proceed.
Included products
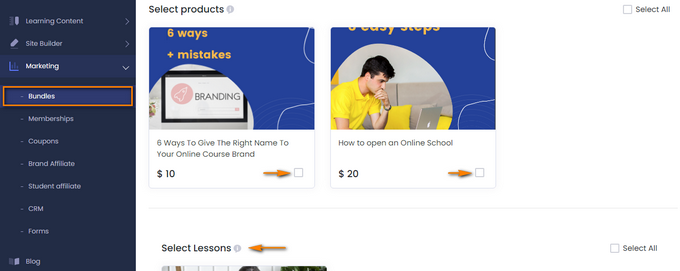
Now you are directed to the marketing products section.

From here, choose any courses, products, and live sessions you want to include in the bundle by ticking the little box.
If you do not have anything displayed in this section, create a course first.
Important Note: Products that are set as Draft or Private cannot be included in the bundle.
Click on the Next button below.
Settings
It’s time to manage the general setting. Afterward, the bundle will be ready to be published.
The first section allows managing the status of your bundle.

- Draft - the bundle is not ready for students to enroll in.
- Published - the bundle is ready for enrollment.
- Unlisted - the bundle is only available for those who have the link.
- Private - the bundle will be available only for students who you provide access to by email address.
The next section includes filling in SEO settings.

- SEO title - displays both on your website and search engines result pages.
- SEO description - shows below the title on search engine result pages
- Bundle keywords - inserted words or phrases will make it easier to find your bundle when included in the searcher’s query.
Click on the Publish button in the button right corner. Ta-da, the bundle is now added to the Bundles list.
If you want to delete any bundle, click on the delete icon on the right of your list.
If you have any questions about coupons, discounts, or anything at all, send us an email at [email protected] or click the blue icon below to chat 😊