How to create a quiz
With the increasing popularity of online quizzes, creating your own can be a fun and effective way to engage with students and test their knowledge on a particular subject.
Follow the steps below to provide a full learning experience for your students.
- Navigate to the Teaching materials tab from your dashboard.
- Go to the Quizzes subtab.
When using our quiz management system, you have powerful tools at your disposal to streamline your experience: filtering and question tags. These features help you quickly find and organize quizzes based on specific criteria.

Filtering Quizzes
Our filtering system allows you to narrow down the list of quizzes displayed based on various parameters. You can filter quizzes by:
Author: Select the author from a drop-down menu to see only quizzes created by that person.
Status: Filter quizzes by their status, such as "Published," "Draft," or "Archived." This helps you keep track of quizzes that are ready for use and those that might need more work.
Date: You can filter quizzes by date in two ways:
- Earlier than: Enter a date to find all quizzes created before that date.
- Later than: Enter a date to find all quizzes created after that date.
These date filters are invaluable for managing a large number of quizzes over time, helping you to find relevant content quickly.
To use the filters:
- Simply select or enter the criteria you wish to apply.
- The page will automatically update to display only the quizzes that meet your specified filters.
Clearing Filters If you wish to clear all filters and return to the full list of quizzes, click the "Clear" button.
Question Tags
Question tags are a tagging feature that allows you to categorize questions within quizzes for better organization and retrieval. This is particularly useful when you have a large database of questions or when you need to identify questions that cover specific topics, skills, or difficulty levels. Check out this article, which will help you to create a tag.
To create a new quiz follow the steps
- Click on the Create New Quiz button on the right.
Quiz main description
From this section, you add the main information about the quiz.

- Title - fill in the name of the quiz in the corresponding field
- Image - choose an image to make the quiz more appealing. The image size should be no bigger than 1320x744px.
- Description - add a description so that the students know what to expect.
Below you can see several toggles allowing you to customize the quiz.
- Automatic checking - if the question does not contain long text answers, activate this button, and the quiz results will be shown immediately after passing it.
- No registration required- if you activate this toggle, students will be able to pass the quiz without registering on the website first.
- One question - if you don’t want all the questions to appear at once, activate this toggle. The questions will be displayed one by one.
- Show If Answer Is Correct - if you want students to see whether their answer is correct or incorrect right away, not at the end of the activity.
- Explanation enabled - if you activate this option you can add an explanation to the questions.
- Hide answers - activate this toggle if you don’t want the students to see right/wrong answers after passing the quiz.
- Show Results in % & Points Only -if you activate this option, students will see only their final score as a percentage and points, without viewing correct or incorrect answers.
- Time - if you activate this button, the duration will be set.
- Set Quiz Attempts - if you activate this option, you can limit how many times a student is allowed to take the quiz.
Choose duration - Insert the maximum time limit for completing the quiz in the box below.
Passing score - You can also set the passing score, i.e., the minimum percentage a student must achieve to complete the course successfully.
The passing score will come in handy when you want to add the quiz to the video courses section. When you attach the quiz with the passing score to the video course, the students will not be able to access the next episode unless they reach or go over the passing score.
For example, if you set the passing score as 60% and the student only gets 55%, they will have to repass it with 60% or more to access the next episode.
Choose the author of the quiz from the list or create a new profile.

Choose Quiz page type
The page type dictates how quiz content is presented to users. Here's a rundown of the different page types you can select:

Linear
- The linear page type is the most straightforward layout, where only quiz questions are displayed one after the other. This format is clean and simple, minimizing distractions and guiding the participant through the quiz in a sequential manner.
Sidebar
- The sidebar page type features additional text beside the quiz question, which provides extra context or information. This is useful when you need to give instructions, background information, or additional details to help the participant understand or answer the questions.
Audio
- The audio page type includes an audio recording that the quiz taker can play. This is particularly useful for language learning quizzes, listening comprehension tests, or any other quiz where audio is an integral part of the question. The recording can be set to be playable only once to mimic real-life listening conditions or to test memory and attention.
Each page type serves a different purpose and enhances the quiz experience based on your content and goals. When choosing a page type, consider the nature of your quiz and what would be most beneficial for the participants in terms of understanding and interaction.
Click on Save and go ahead button below.
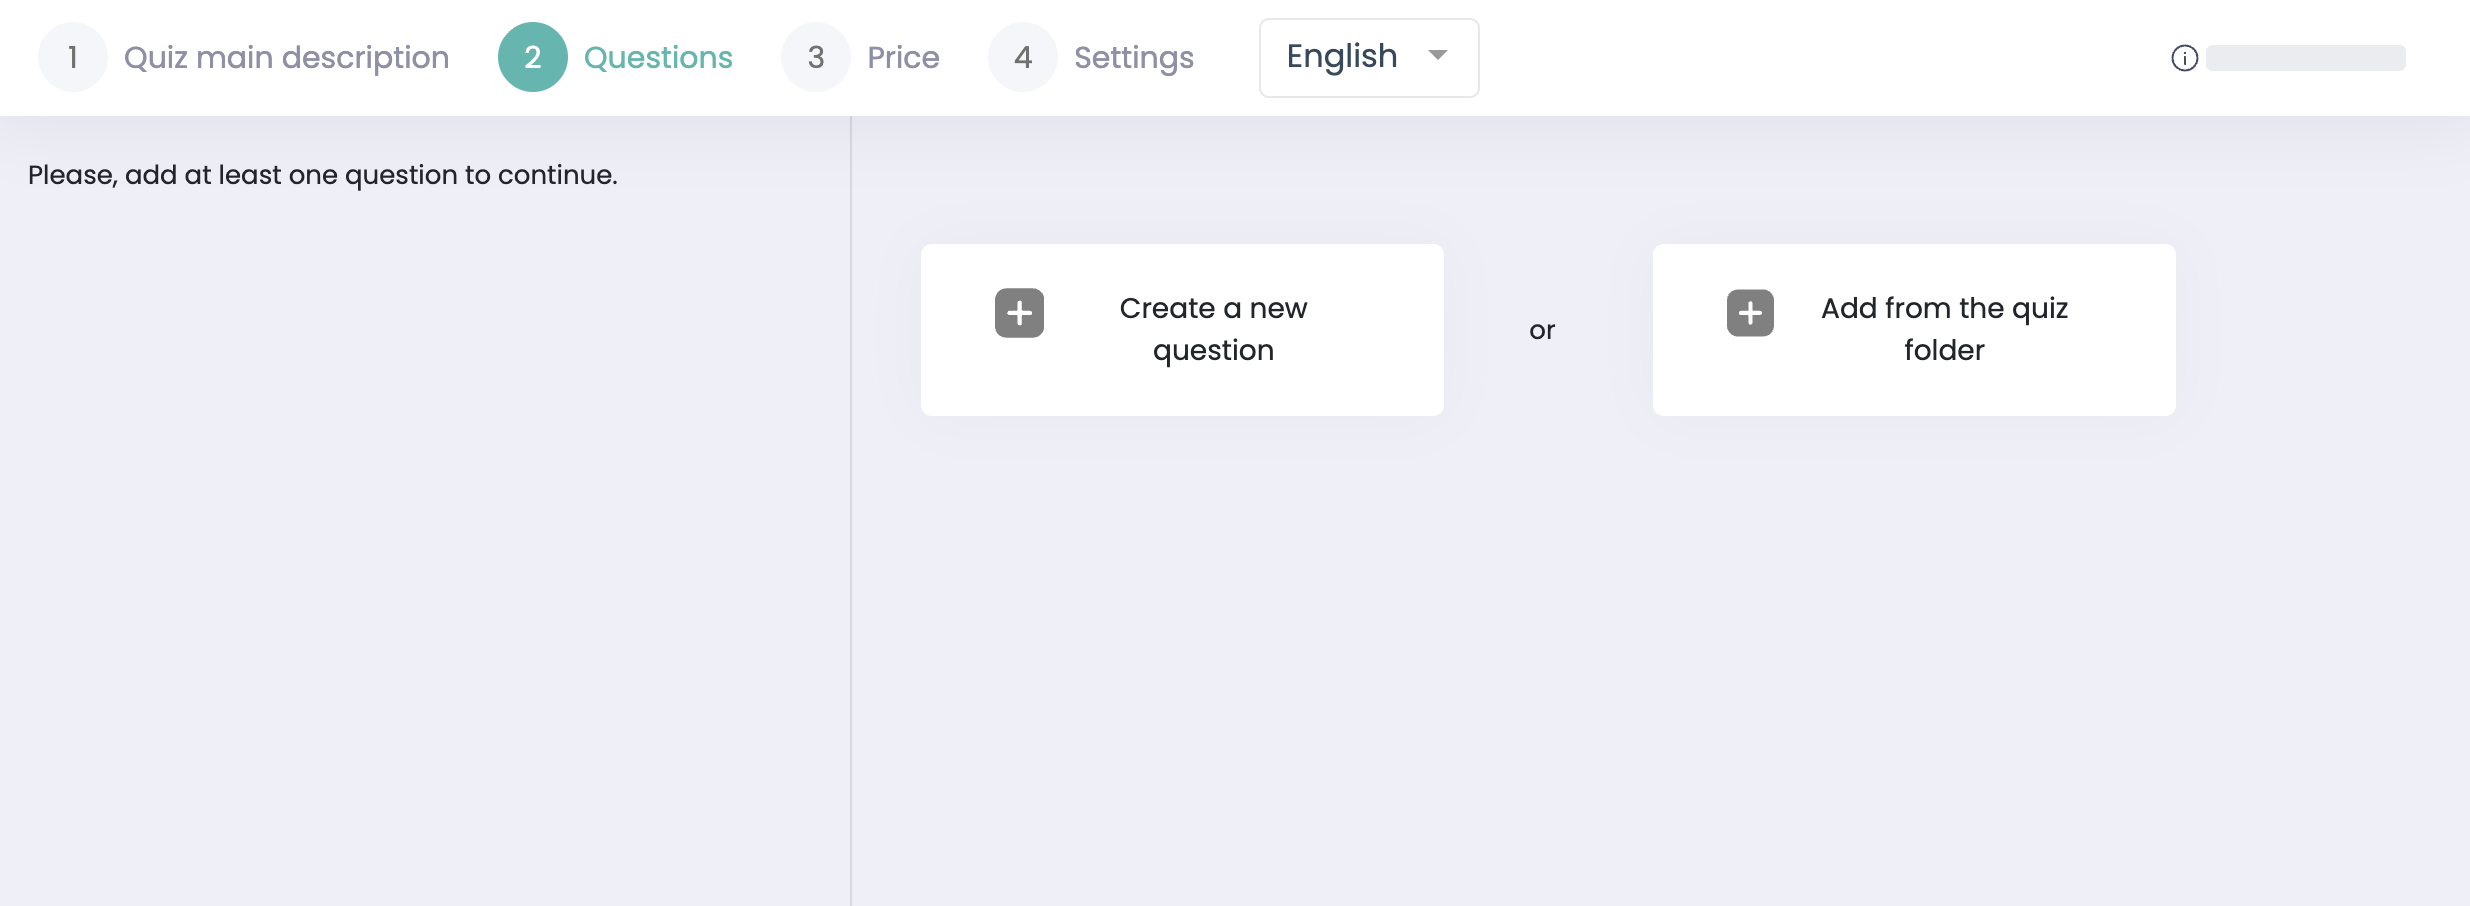
Linear Quiz Questions
If you choose the linear page type, you will see the following question style.
- Click Create a new question to write one from scratch
- Or click Add from the quiz folder to use saved questions from folders
1. If creating a new question
Insert your question in the corresponding box. You can include audio, an image, or a video file.

If you choose the video, you will also be able to add a thumbnail for the quiz video.

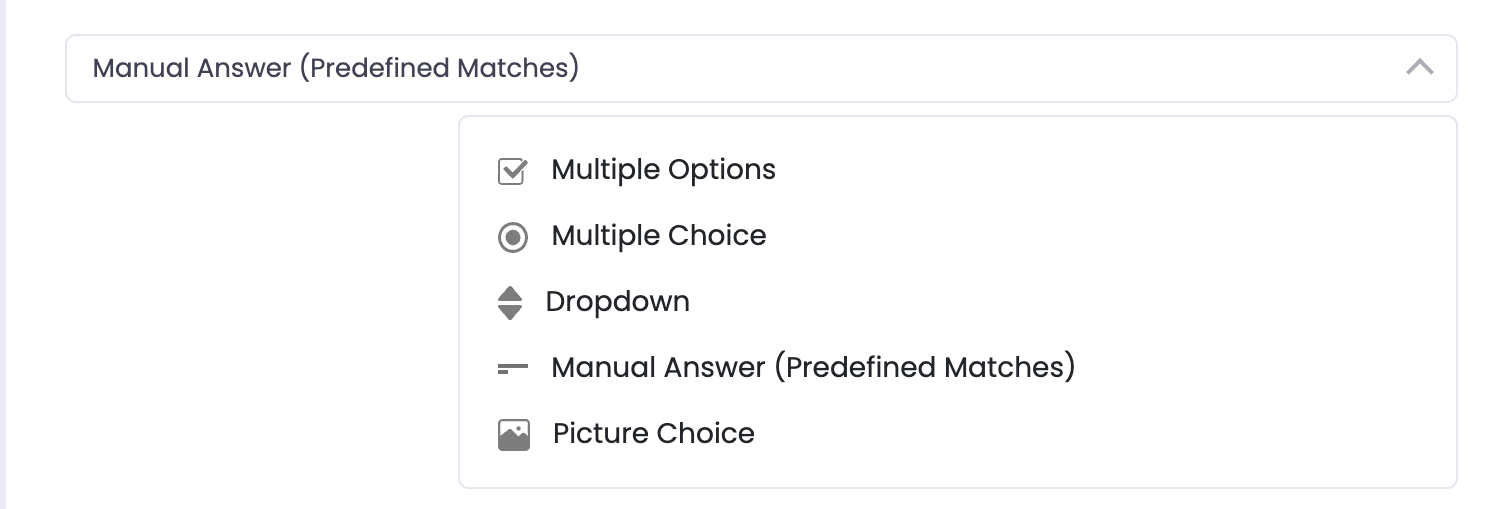
The next step is selecting the answer type. If, in the first step, you activated the “Automatic checking toggle,” the answer types will be the following ones.
- Multiple Options ( more than one correct answer option)
- Multiple Choice (one correct answer option)
- Dropdown
- Manual Answer (Predefined Matches)- if you activate this option, you can define multiple acceptable answer variations (for example, different wording or capitalization),and the system will mark the answer as correct if it matches any of them.
- Picture Choice
If you have chosen any choice option, click on Add new answer. Indicate the right answer to the question. For another question, click the Save & add new question button.

If you didn’t activate the Automatic checking toggle, here are the options you will get in the Questions section:
- Multiple Options ( more than one correct answer option)
- Multiple Choice (one correct answer option)
- Dropdown
- Short text
- Manual Answer (Predefined Matches)
- Picture Choice
- Long text
- Upload a file answer (student can upload their answers)
The File must be a file of type: jpg, png, mp4, pdf, CSV, xlsx, ppt, pptx, xls, mp3, doc, txt, docx, rtf, xml, zip, json, webp, mov.

Important Note: Auto-checking works only with the question types you can indicate the right answer for. So, when you select short, long, and file question types, the system cannot tell if the answers are right or wrong.
If you have activated


You can choose a tag from the list or create a new one.

However, you can add explanations to each question so that your quiz becomes more comprehensive for the student. This means when they get the question answer wrong, they will get the explanation for the right answer. Click the Add an Explanation button and fill out the box. You can delete and edit the explanation at any time.

You can add your question to a folder while setting it up, so you can use it later.

Select an existing folder or click Create new quiz folder.
If you're creating a new folder, you will be redirected to the folder list. Click 'Create a New Folder', add title, save it and return to the quiz setup page. You will see the refresh icon turn green—click it, and your newly created folder will appear in the list.

Once everything is filled, click Save.
Sidebar Quiz Questions
If you choose the sidebar page type, you will see a description field that needs to be filled in. Save and go ahead, and start adding your questions.

Audio Quiz Questions
If you choose the sidebar page type, it will include questions that are based on audio recording.

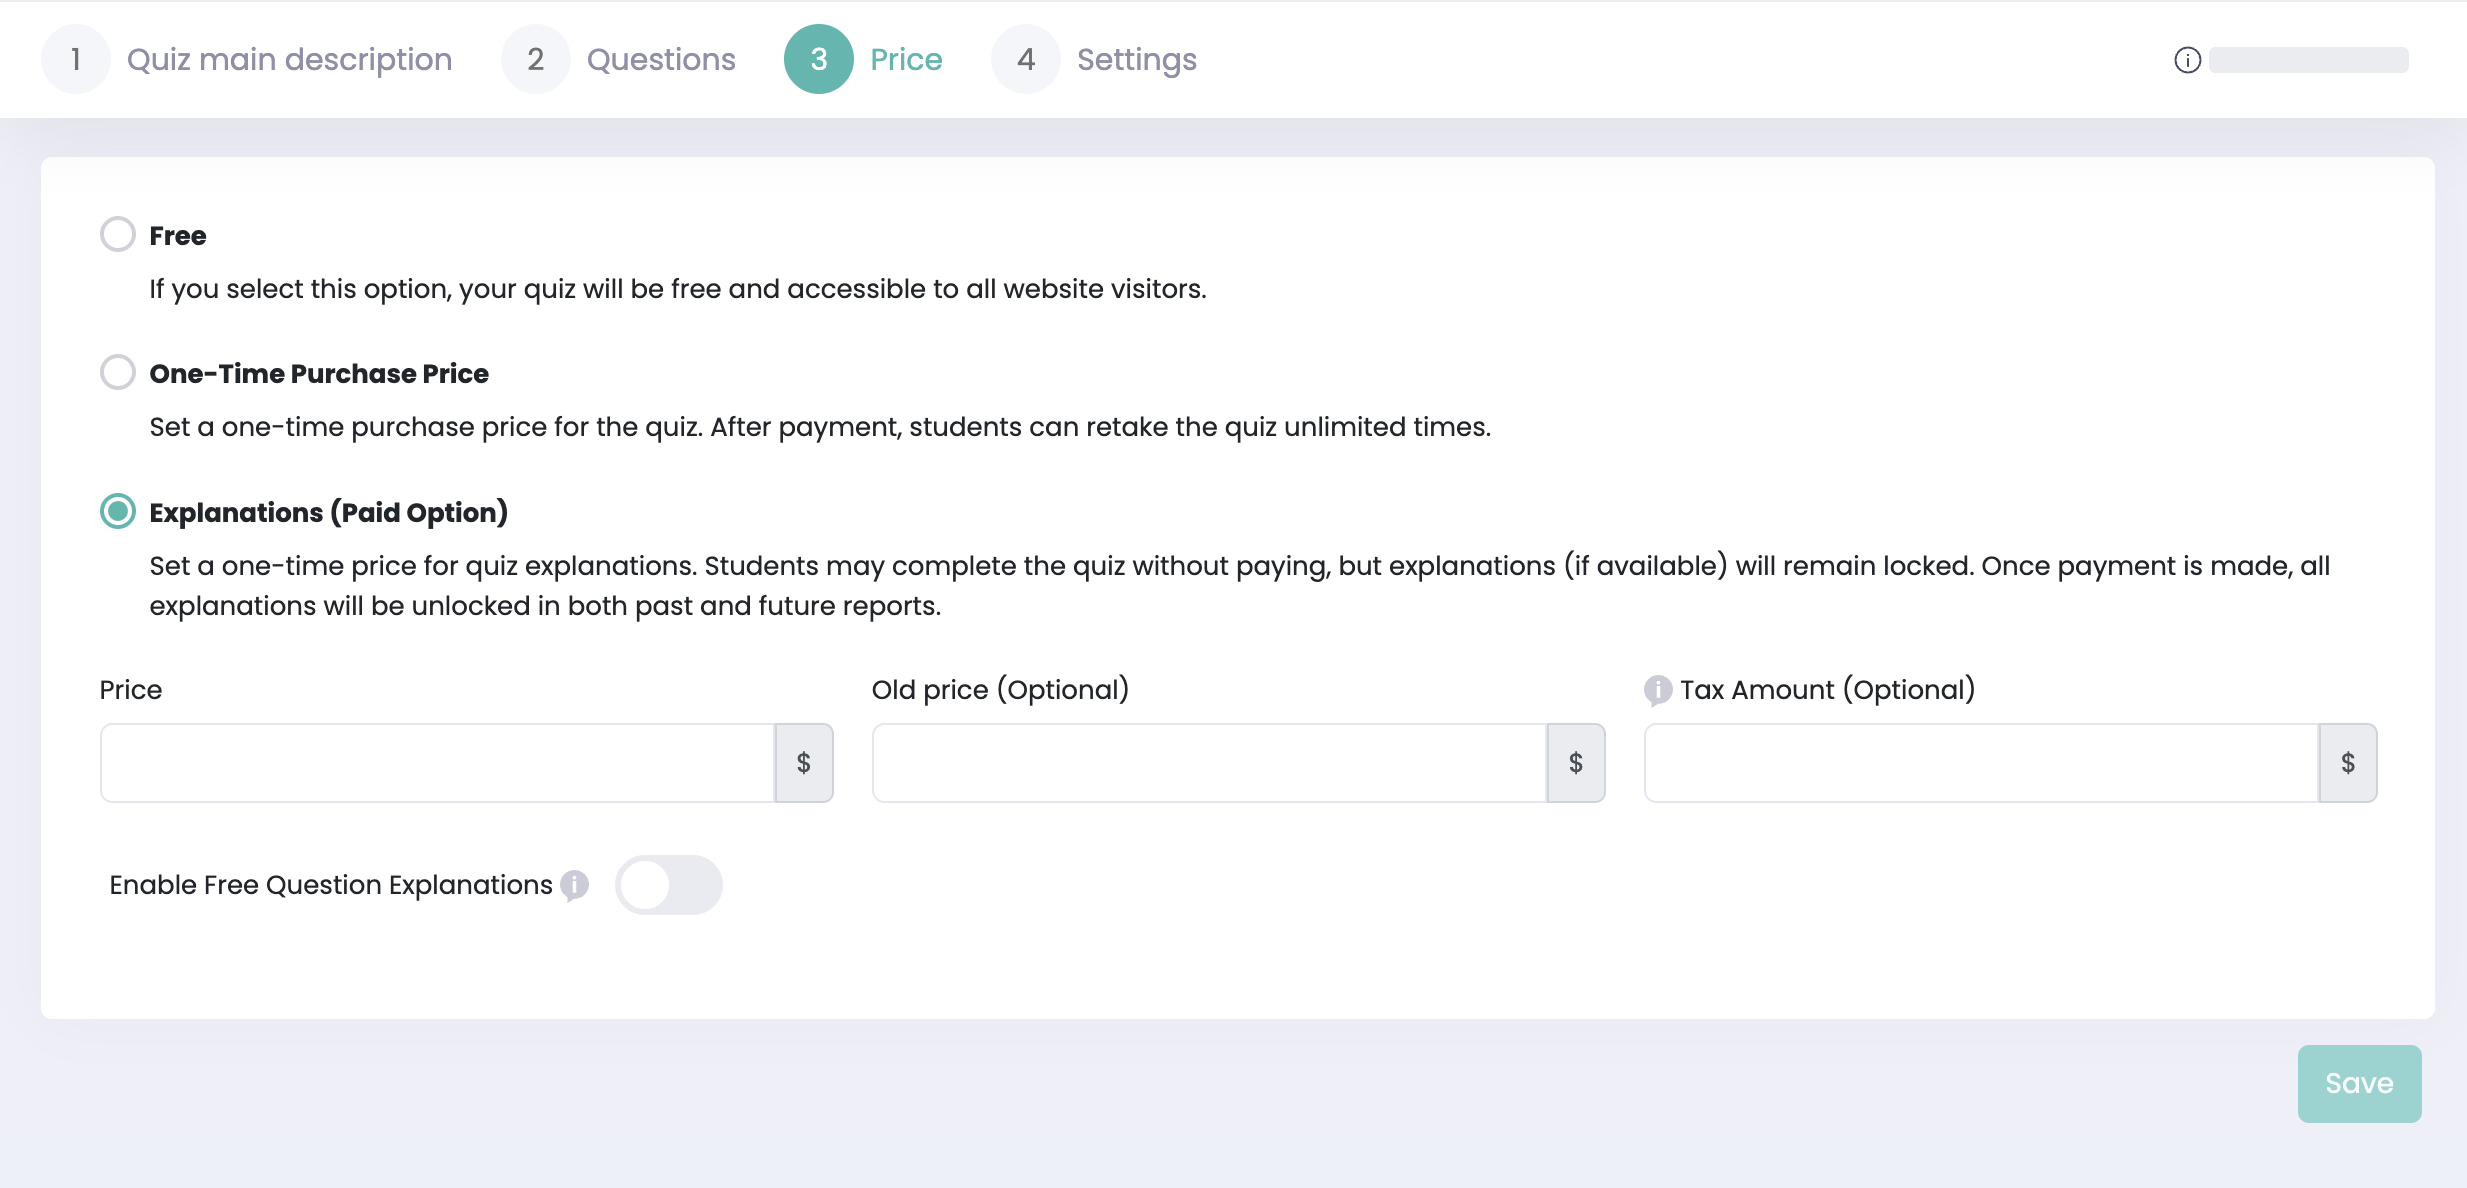
Quiz Price Settings
In the Price step, you can control how your quiz is monetized. Uteach offers flexible pricing options so you can make your quiz fully free, sell access to the quiz itself, or charge only for explanations.
Free
If you select Free, your quiz will be available at no cost and accessible to all website visitors. No payment will be required to take or retake the quiz.
This option is ideal for:
- Lead generation quizzes
- Practice tests
- Free assessments or demos
One-Time Purchase Price
With One-Time Purchase Price, you can set a fixed price for accessing the quiz.
How it works:
- Students pay once to unlock the quiz
- After payment, they can retake the quiz unlimited times
You can optionally set:
Old price (to show a discount)
Tax amount (if applicable)
This option is useful when the quiz itself is a premium product.
Explanations (Paid Option)
The Explanations (Paid Option) allows you to monetize quiz explanations only, while keeping the quiz itself free.
How it works:
- Students can complete the quiz without payment
- Explanations remain locked until payment is made
After payment:
- All explanations are unlocked
- Explanations become available for both past and future quiz attempts
This option is ideal for:
- Exam preparation quizzes
- Educational platforms selling detailed solutions
- Freemium quiz models
Enable Free Question Explanations
When using Explanations (Paid Option), you can optionally enable Free Question Explanations.
If enabled:
- Students can view explanations for a selected number of questions without payment
- You control this limit using Free Question Count
- Once the free limit is reached, explanations remain locked until purchase
- This helps encourage purchases while still giving students a preview of the explanation quality.
Settings
It’s time to customize some settings to give your quiz a final look.
Here are the main options of the quiz status you can choose from.

- Draft - choose this option if the quiz isn’t ready yet and you want to save it in your dashboard for further changes.
- Publish - choose this option if the quiz is ready to be taken
- Unlisted - choose this option so only the students you send the link can access the quiz.
Shuffle Questions
Our quiz platform provides several shuffling options to help tailor the experience:
All
- When this option is selected, it shuffles all available questions in the quiz. This means every time a user takes the quiz, they will be presented with the questions in a different order. This helps to prevent memorization of question order and encourages true understanding of the material.

Limited Shuffle
- By choosing the limited shuffle option, you can restrict the shuffling to a specific number of questions. After selecting this option, you'll specify the "Count Of Random Questions" you want to include from the pool.

Limited Shuffle By Tags
- This option allows you to shuffle questions within specific tags. This is particularly helpful when you have categorized your questions by topic, difficulty, or any other custom tag system you’ve implemented. For example, if you've tagged some questions as "Beginner" and others as "Advanced," you can ensure that a quiz dynamically generates with a balanced number of questions from each category. After selecting this option, you'll enter the number of questions you want to pull from each tag in the "Count Of Random Questions By Tags" field.

When Hide Question Points During Quiz is enabled: Students will not see point values while answering questions.
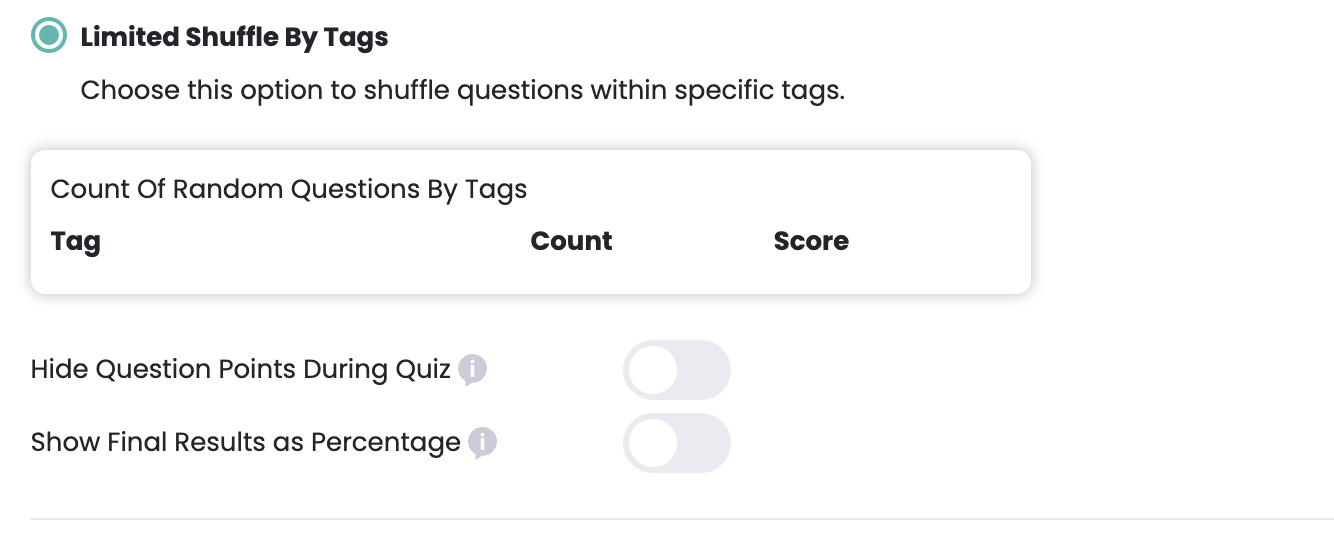
Question points and detailed scoring are revealed only after submission in the final results report
This option helps:
- Reduce score-focused behavior
- Encourage students to focus on answering correctly rather than guessing based on points
When Show Final Results as Percentage is enabled:
Quiz results are displayed as a percentage (e.g., 85%) instead of total points
This applies to:
- On-screen results
- Final quiz reports
- This option is useful for:
- Exams with varying point values
- Standardized assessments
- Pass/fail or percentage-based grading systems
Using these shuffling options not only makes each quiz attempt unique but also adds an extra layer of customization, ensuring that the quiz adapts to the specific learning goals you've set. It's also a valuable tool for reducing the likelihood of cheating by ensuring that no two participants see the same set of questions in the same order during an assessment.
To learn how to enable points for your quizzes, read this article.
SEO details
Filling in SEO details is not compulsory in the quiz creation process. However, you can add them, so your quiz is visible on search engine results pages.
Add the title, meta description, and some keywords.

Now your quiz is ready to be published!
After publishing your course, you can either use your quiz as a standalone learning material or add it to a course. To learn more about how to add a quiz to a course, click here.
If you have any questions, send us an email at [email protected] or click the blue icon below to chat 😊
Author![{"id":2,"user_id":25,"slug":"lusine-mkhitaryan","full_name":"Lusine Mkhitaryan","position":"Customer Support Specialist","tagline":"Customer Support Specialist","image":"uteach\/authors\/LxVlxPVHH6bKnNI51DR8-1743576946\/t02qfsy3cq2-u02u10sqk1q-727b0c81e36f-512.jpg","short_text":"I\u2019m a motivated Customer Support Specialist who thrives on making every customer experience smoother, more efficient, and more positive. \r\n\r\nI am dedicated to addressing customer needs with empathy, professionalism, and efficiency, always aiming to provide clear and effective solutions.\r\n\r\nMy approach emphasizes understanding the unique challenges customers face and finding creative ways to resolve them. I\u2019m passionate about streamlining support processes, optimizing workflows, and using innovative tools to deliver the best possible outcomes for customers.","education":"<ul><li>Bachelor's in English Language and Literature, Brusov State University\u00a0<\/li><li>Certified in Customer Service: Managing Customer Expectations<\/li><li>Certified in Innovative Customer Service Techniques<\/li><li>Certified in Working with Upset Customers<\/li><\/ul>","experience":"<ul><li>Customer Support Specialist at Uteach\u00a0<\/li><li>Digital Marketing Specialist at Munich Ventures\u00a0<\/li><li>Learning Platform Coordinator at WooChess\u00a0<\/li><li>E-commerce Administrator at Hafo.am\u00a0<\/li><li>Content Writer at Armenia Discovery<\/li><\/ul>","social_insta":null,"social_fb":null,"social_twitter":null,"social_linkedin":"https:\/\/www.linkedin.com\/in\/lusine-mkhitaryan","meta_title":"Lusine Mkhitaryan | Uteach Authors","meta_keywords":null,"meta_description":null,"json_ld":"{\r\n \"@context\": \"https:\/\/schema.org\",\r\n \"@type\": \"Person\",\r\n \"name\": \"Lusine Mkhitaryan\",\r\n \"jobTitle\": \"Customer Support Specialist\",\r\n \"worksFor\": {\r\n \"@type\": \"Organization\",\r\n \"name\": \"Uteach\",\r\n \"url\": \"https:\/\/uteach.io\"\r\n },\r\n \"alumniOf\": {\r\n \"@type\": \"EducationalOrganization\",\r\n \"name\": \"Brusov State University\"\r\n },\r\n \"hasCredential\": [\r\n {\r\n \"@type\": \"EducationalOccupationalCredential\",\r\n \"name\": \"Customer Service: Managing Customer Expectations\"\r\n },\r\n {\r\n \"@type\": \"EducationalOccupationalCredential\",\r\n \"name\": \"Innovative Customer Service Techniques\"\r\n },\r\n {\r\n \"@type\": \"EducationalOccupationalCredential\",\r\n \"name\": \"Working with Upset Customers\"\r\n }\r\n ],\r\n \"knowsAbout\": [\r\n \"Customer Support\",\r\n \"Workflow Optimization\",\r\n \"Support Automation\",\r\n \"Empathy in Service\",\r\n \"Conflict Resolution\"\r\n ],\r\n \"sameAs\": [\r\n \"https:\/\/www.linkedin.com\/in\/lusine-mkhitaryan\/\"\r\n ]\r\n}","created_at":"2025-01-24T16:10:14.000000Z","updated_at":"2025-04-24T22:38:45.000000Z"}](https://d35v9chtr4gec.cloudfront.net/uteach/authors/LxVlxPVHH6bKnNI51DR8-1743576946/t02qfsy3cq2-u02u10sqk1q-727b0c81e36f-512.jpg)