How to create a certificate
One of the happiest moments is awarding students certificates after completing the course or quiz. Uteach helps to make the certificate creation process even more enjoyable.
Please follow these simple steps to customize certificates.
- Go to the Teaching Materials tab of your dashboard.
- Navigate to the Certificates subtab.
All the certificates you create will be displayed here. Click on the Create New Certificate button in the upper right corner.

You can choose a template to work on. Templates can be found at the bottom. If you want, you can also upload your own background in PNG format by clicking on the Browse button.

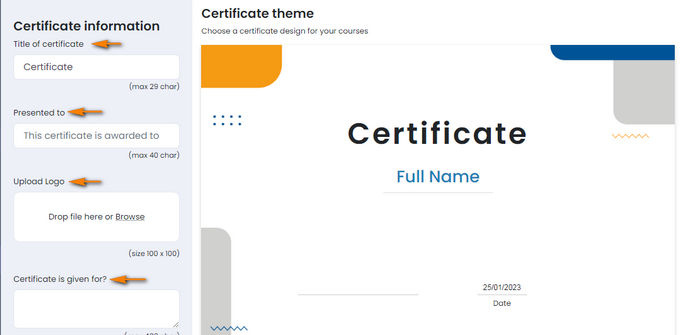
Now, fill in the required information and watch it appear on the template.

Title of certificate - mention the type of certificate you award, for example, Certificate, Certificate of Honor, Certificate of Appreciation, and the like.
Presented to - add phrases such as “is given to”, “is presented to” and the like.
Upload Logo (optional) - in case you have a logo, you are free to upload one
The certificate is given for - Provide some details

Certificate is given from - Mention your name or your organization's name.
Upload the signature (optional) - the signature with transparent background will automatically display on the template.
Upload the stamp (optional)- insert the electronic version of your stamp if you want.
Enable QR Code - This option allows you to add a unique QR code for each student when generating their certificate.

Once you are done, click on the Save button. Once your Certificate is ready, add it to a video course. So, when the students complete the course, they can get the certificate.
If you have any questions, send us an email at [email protected] or click the blue icon below to chat.